My experience switching BetaList from Heroku to Render

I started BetaList as a Tumblr site back in 2010 to give startup founders and early adopters a place to discover each other and share feedback. Since then it has evolved a lot. Both functionally and technically.

It was a Sinatra app for a while, and later I switched to Ruby on Rails 3. As the years went on I kept the codebase up-to-date by upgrading anytime a major new Rails version came out. (Running on Ruby on Rails 7 now with the Hotwire goodness.)

I played with the idea of moving away from Heroku for a while. For a few reasons. The most concrete reason being costs, but I also felt like their product development stalled the last few years and although I’ve had some good experiences with their support team, overall the company seemed more interested in serving huge enterprise clients rather than a startup like my own.

At one point one of their sales reps called me (still not sure how they got my phone number) and repeatedly emailed me trying to upsell me on a $1,400/mo Enterprise plan with a 12-month commitment. I guess someone needed to hit their quota 😅

Render

Because of these reasons I’ve been exploring alternatives. I briefly tried self-hosting with one app, but when the server randomly went down one night because my logfiles filled up the disk (apparently they don’t automatically get deleted?), I realized I don’t want to play devops engineer

I ultimately settled on Render. They provide a similar “Devops done for you” product as Heroku at a more reasonable price point, the product is actively developed, and the team seems more in touch with their customers. Not just the enterprise ones.

Over the past year, I’ve been migrating all of my apps from Heroku to Render. First some smaller apps, and eventually some of my bigger sites like Startup Jobs. Since many makers are curious about switching to Render, I figured it would be valuable to document one of those migrations for others to benefit from.

I recently switched BetaList to Render as well and documented my approach below. I’ll also share some of the unexpected issues I ran into, and explain how I solved them.

Disclosure — I've been a paying customer of Render for a while and they recently became a BetaList sponsor.

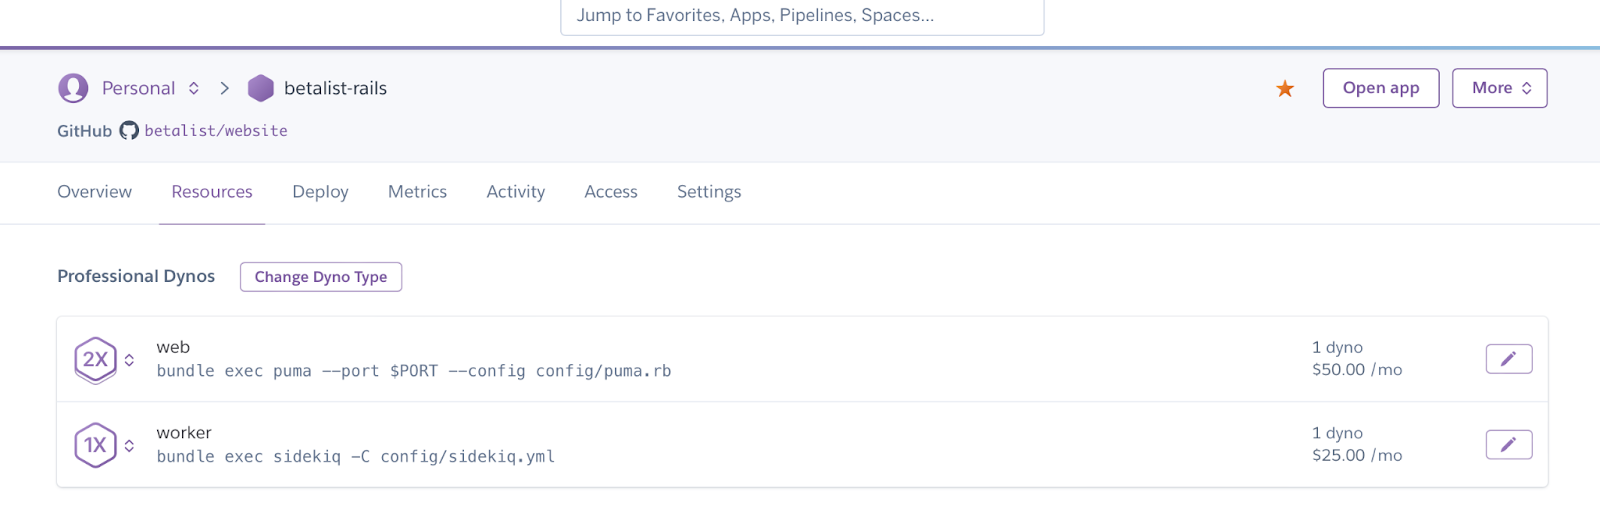
 Previous Heroku stack

  • Rails 7.0.4 / Ruby 3.1.2
  • Web dyno ($50/mo)
  • Worker dyno for Sidekiq background jobs ($25/mo)
  • Postgres ($50/mo)
  • Redis (for caching and Sidekiq background jobs) ($25/mo)
  • Scheduler ($5/mo)
  • Adapt Scale for scaling up/down web workers ($18/mo)

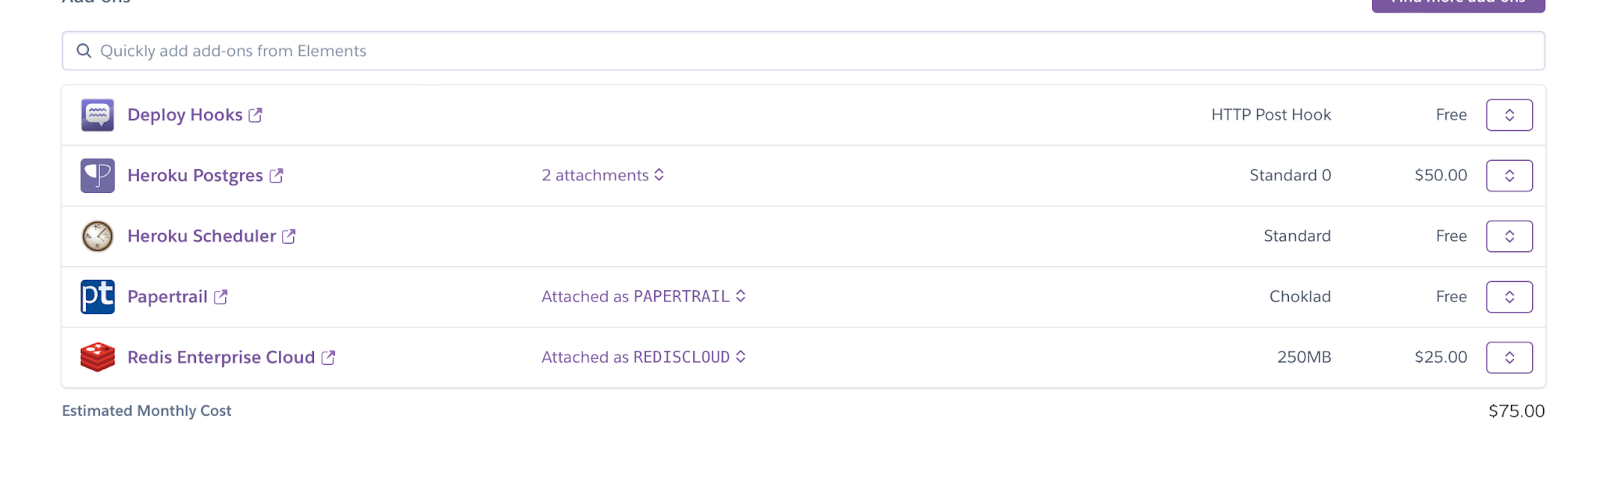
On average I was paying around $175/mo at Heroku for BetaList. Not horrible, but if you run multiple sites like I do this will start to add up.

The migration process

Here’s roughly how I approached the switch:

  1. Deploy a few smaller apps on Render.

  2. Prepare the BetaList codebase.

  3. Deploy a test version to Render.

  4. Import (sanitized) production data.

  5. Migrate for real.

1. Migrate few smaller apps

Before migrating, I got familiar with Render and render.yaml. Rather than configuring everything through the dashboard (which is still possible as well), you can write a document as part of your codebase that defines which services to use, etc. It’s one of my favorite features.

You spend a lot of time configuring your servers, etc so it’s nice to have a concrete copy of all that work. It makes it easier to experiment as well as you can always revert. Plus, you can easily copy your server setup between projects.

2. Preparing the codebase

Good preparation can save a bunch of work. I started by moving all of my API keys and other sensitive data from environment variables to the more portable Rails Credentials. I also backed up my config variables with with just to be safe. (Don’t commit this file to your git repository).

heroku config > herokuconfig.txt

Any remaining environment variables (typically non-sensitive configuration settings like the webserver’s concurrency), I added to my render.yaml blueprint in the next step.

Screenshot of Heroku Scheduler

For the jobs I had been running with the Heroku Scheduler (see screenshot), I initially tried using Render Cron, but it seemed inefficient. Render recreates the whole runtime and runs each execution of a cron job in a new instance of your code, so this meant it rebuilt my app every few minutes. I decided to use Sidekiq Enterprise’s Periodic Jobs instead which is similar in functionality to cron jobs, but re-uses my existing Sidekiq worker.

I already was using Sidekiq Enterprise for other reasons. Although it’s a great piece of software I wouldn’t recommend getting the $200/mo license just for this feature. There are free alternatives like sidekiq-cron or if you only have a handful of cron jobs then Render Cron is probably fine too. (I use it for some other apps with fewer cron jobs).

3. Trying it out on Render

Before I could run the code on Render, there were two things I needed to add:

  1. A render.yaml (the server blueprint I mentioned above).

  2. A couple of simple bash scripts to build and start the server.

In my app, I also needed to disable certain functionality, like sending emails, so I could test the application on Render without impacting BetaList users.

Then, I added my ENV variables to the render.yaml, and created a new “Blueprint Instance” in the Render Dashboard which then automatically sets up all the necessary services using the render.yaml file.

This screenshot is from before I moved the cron jobs to Sidekiq.

At this point I got a version of the site running on Render. Hooray!

The next step was to copy over the production data, still just for testing, to make sure everything still worked as expected.

4. Importing (sanitized) production data

I needed to bring two pieces of data over intact: all the data from my Postgres database (users, startups, comments, etc), and any queued background jobs stored in Redis.

For Redis, I wrote this script which just manually copies over the data between two Redis instances. I didn’t bother copying over any caching data as I could just re-generate it.

For Postgres, migration was a bit more advanced, and I wanted to try it out first with sanitized production data. My servers are based in the US, and I’m in Bangkok. So rather than having multiple round trips downloading/uploading 2GB of data, I added a disk to my Render web service for persistent storage across deploys.

Ithen made a new backup of the Heroku database, and got a URL to download the export:

heroku pg:backups:capture
heroku pg:backups:url

Then, I SSH’d into Render and downloaded the backup. Note: SSH only works on Render after you have successfully deployed the app one time. So make sure your app can deploy without needing any (production) data or you’ll run into a catch-22 problem.

Here’s what I did on the Render server:

cd /var/data

wget "https://xfrtu.s3.amazonaws.com/..." -O latest.dump

(pg_restore --clean --no-privileges --no-owner -d postgres://render-postgres-url/betalist < latest.dump) > restore.log 2>&1

This downloads the Heroku database backup to the disk and then restores it into our database on Render. In theory you could also download the database to your local machine and restore into the Render database remotely, but depending on your location and internet speed that can end up taking a lot longer.

You might notice I also saved all the logs to a file, so we can review it for any errors. Typically a Postgres restore will end up showing a lot of “errors” you can safely ignore. Google is your friend to figure out what’s fine and what isn’t.

One error I ran into was related to the “citext” extension I use in Postgres. Apparently Heroku does some magic to store these custom extensions on a different Postgres schema. To fix this, I had to recreate this heroku_ext schema as well and manually enable the citext extension:

CREATE SCHEMA IF NOT EXISTS heroku_ext;

CREATE EXTENSION IF NOT EXISTS citext WITH SCHEMA heroku_ext;

ALTER DATABASE "betalist" SET search_path TO "$user",public,heroku_ext; :+1:

I also highly recommend sanitizing the data at some point during this process. Which might mean removing any user email addresses, OAuth tokens, and payment data. Just in case you accidentally do run some code during testing that fires off a bunch of emails, you don’t want those to actually get delivered.

Once that’s all done you try out the site with real data to see if everything works as expected. It did for me. Yay.

5. Migrating for real

Now that I’d confirmed everything worked, it was time to migrate for real. Which meant putting the site into maintenance mode so no new data was being written to the database. Then I migrated all the production data to Render, and pointed the domain to the Render server.

It’s the same process as before, except I now also configured our DNS and re-enabled any functionality I had temporarily disabled on Render.

DNS changes can take a little while to propagate, but that was fine, because people seeing the old site just saw the maintenance page until their DNS was updated to see the Render-hosted site.

Unexpected issues

The process was relatively straightforward, but there were two issues I ran into:

Slow database

After migrating the site for real, I suddenly found that database was super slow. This was unexpected because when I tried it before everything was fine.

At first I thought it was an issue with my Postgres instance, but it later turned out there was one specific database query in the admin area that was extremely slow and taking down the whole site. If I would have tested more extensively I would have caught this before, so I highly recommend taking some time to test all the major functionality of your site.

Fortunately, Render support went above and beyond and figured out why this query was so slow. Here’s Jennifer (software engineer at Render):

The work_mem parameter was set to 1MB for your Render db. I created a standard-0 db in Heroku (4 GB ram) and looked at its work_mem parameter, and it was set to 32MB - this is actually much higher than what's recommended by PGTune, which uses a formula like: Total RAM * 0.25 / max_connections

I've updated your Render database's work_mem value to 16MB. The explain analyze for your query now shows a matching query plan to the heroku one and runs in ~400ms.

So in a nutshell it wasn’t Postgres being slow, it was just that one poorly designed database query that took down the rest. Rewriting this query to be more performant should be relatively straightforward, but for now that database configuration change does the trick.

Cloudflare issue

Another issue I briefly ran into happened right after updating my Cloudflare DNS to point to Render. Rather than showing my site, betalist.com would show a cryptic Cloudflare error message:

Changing the domains was something I didn’t bother testing before, but in hindsight perhaps I could have tested changing DNS as well with some subdomain first.

I’m not exactly sure what the issue was, but I know Render uses Cloudflare in the background, as do I, to manage my DNS settings. It seemed like somehow Cloudflare wasn’t able to figure out how to map my domain to the right Render service. Removing and re-adding the domains to my Render server quickly reset routing and resolved the issue.

Conclusion

Apart from those two issues, which resolved fairly quickly, it’s been a smooth experience. I have a clear overview of the infrastructure of my apps, can easily start new ones re-using the same render.yaml file, and I don’t need to worry about costs as much as Render is a lot more affordable (see below).

Final numbers:

  • Web service $15/mo
  • Worker $15/mo
  • Postgres: $20/mo
  • Redis cache: $10/mo
  • Redis persistent: $10/mo

Total: $70/mo (60% cheaper than Heroku)

Summary

Migrating servers can be intimidating, especially if it’s for a profitable business and you don’t have any devops people on your side to help out. So that’s why I recommend first trying it with a smaller app (good excuse to make that weekend project you’ve been thinking about!) to build some experience and confidence. And once that’s running smoothly and you like how it all works, you migrate your main site as well following similar steps as I did.

I’m on Twitter if you want to know more details about any of the above steps.

Here's where I try to convince you to subscribe to my newsletter so I become less dependent on Twitter and other media when publishing new blog posts or launching new projects.

I will email a few times per year. You can opt out anytime.